Wednesday, September 1, 2021

Queen vs Pawn about to Promote: The Missing Link

Most mistakes by the superior side in queen vs. pawn endgames do not occur in the theoretically important positions with the pawn on the 7th rank that are the focus of endgame books. Rather, they occur with the pawn on the 6th rank. Such was my conclusion from a brief analysis of games in the Chessbase Mega Database from 2019 to the present. [For those interested in the analysis supporting this conclusion, see the note on methodology at the end of this post.] There are many reasons for errors in these positions, but an important and surprising one is that amateurs fail to consider a simple, but key, principal of queen vs. pawn endgames. What is it? The side with the queen wins if it can get its queen in front of the pawn. Simple stuff, but endgame books don't mention it or only do so in passing probably because the titled players who write them consider the point to be trivial. Trivial it might be, but points are lost by many amateurs because this principal is ignored. Let me explain this and the other errors that amateurs commonly make in these endings. First some basic endgame theory.

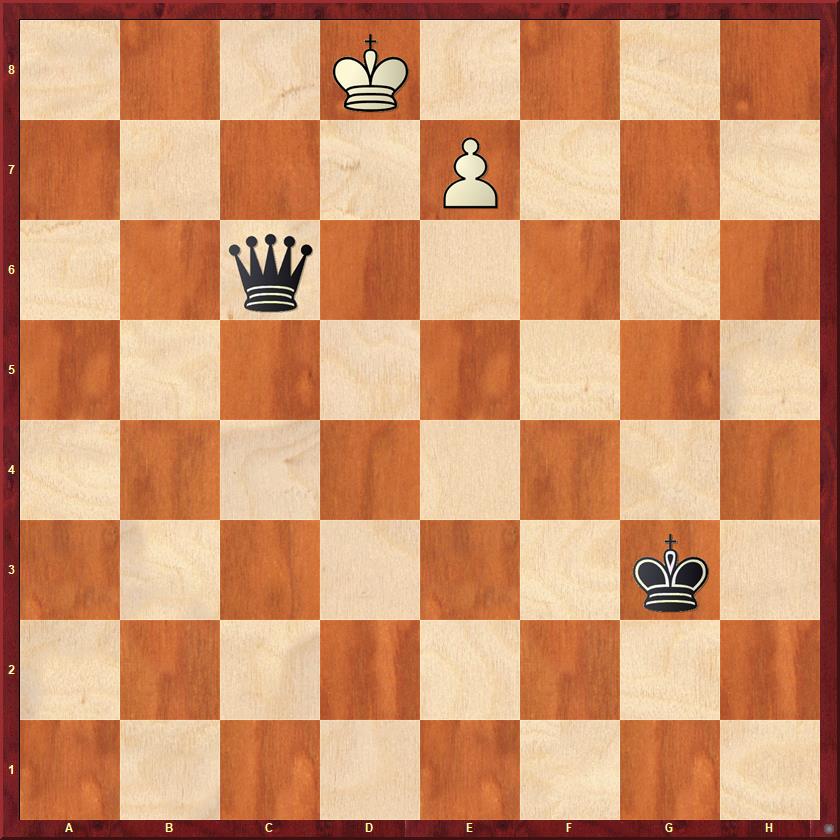
As is well known, the side with the pawn in a queen and pawn endgame can draw if the pawn is a rook or bishop pawn on the 7th rank and supported by the king on the 7th or 8th rank, and the opposing side's king is not too close. I'm not going into the analysis here as all endgame books cover it, but the basic ideas are as follows. In these queen vs pawn endgames the side with the queen wins by repeatedly forcing the opponent's king directly in front of the pawn, which gains it a tempo to advance his king forward. Once the king is close enough the opponent's pawn is taken or his king checkmated. For example, in the following position after black plays Qd6+, white must play Ke8 or lose the pawn and this allows the black king to advance.
In the case of rook and bishop pawns this does not work. When there is a rook pawn, the defending side has a stalemate defense as in the following case where black has forced white's king in front of his pawn, but can't advance his king as it would be stalemate. There is no way around this, and the position is drawn with correct play. 
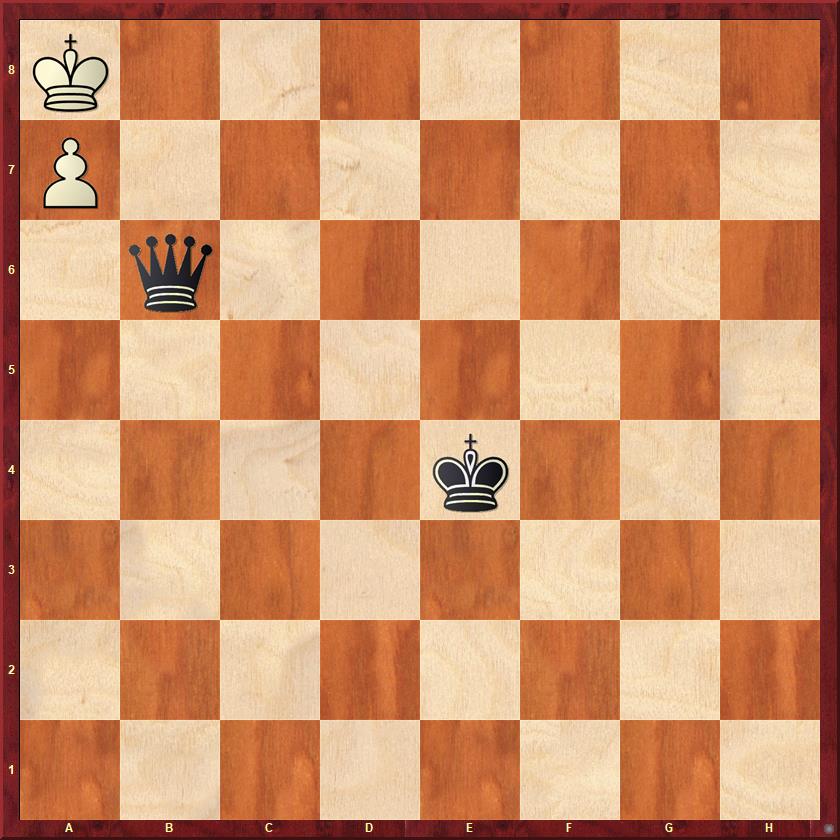
I saw "with correct play" because white can lose if he stops thinking. There are several examples in the database of helpmates such as 1...Qc6+ 2. Kb7, Qd7+ 3. Ka8, Qc8#.

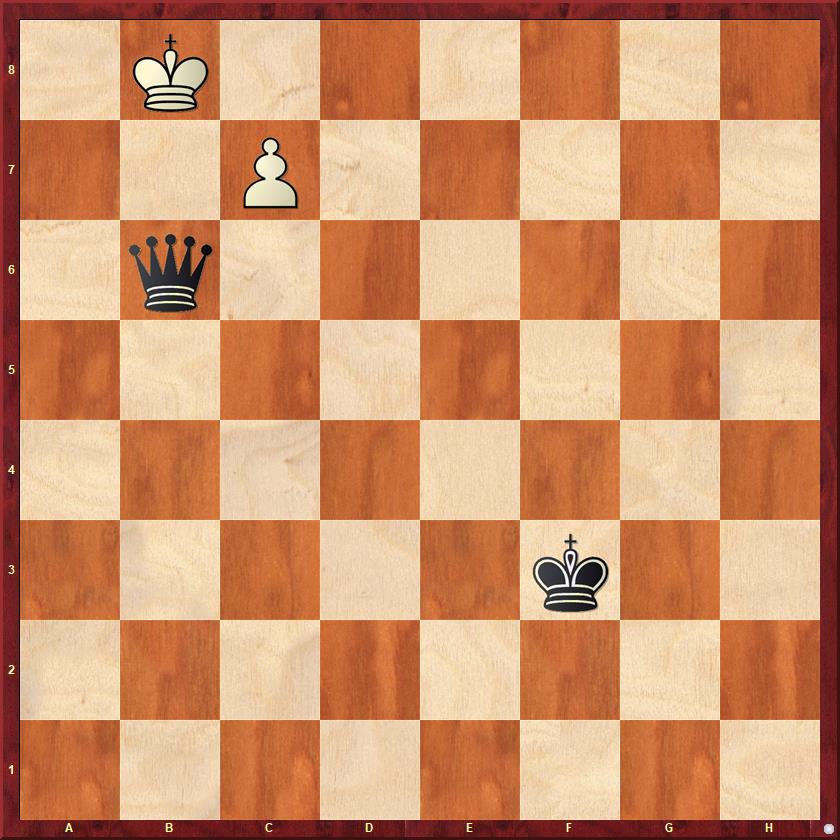
In the case of bishop pawns, the stalemate trick is simply to put the king in the corner so that it is stalemate if the queen takes the pawn. Thus, in the following diagram, white should play Ka8 and black can't make progress.
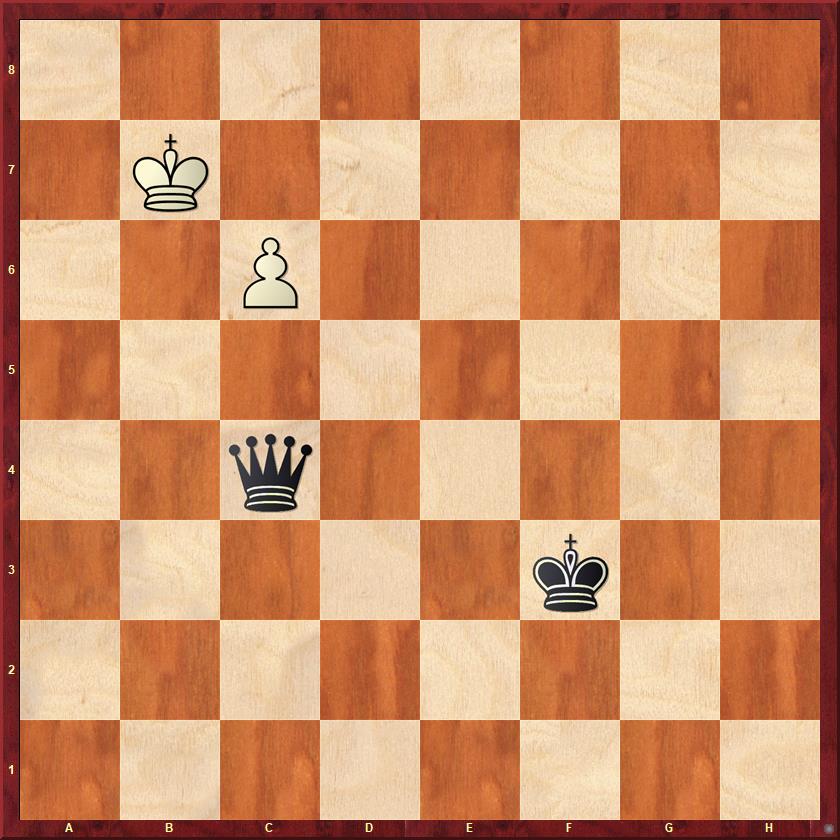
Now, if the rook or bishop pawn is on the 6th rank, then the side with the Queen is winning in most positions. For bishop pawns the ordinary strategy is the same as that applied to to b, d, e, and g pawns that are on the 7th rank: repeatedly check the king until he has been forced directly in front of the pawn, allowing the side with the queen to advance his king. Sometimes, though, this is not possible and there are only two alternative ways to make progress that are often overlooked by amateurs: pin the pawn to the king or move the queen in front of the pawn. Whatever happens the side with the queen must not allow the pawn to advance to the 7th rank. For example, in the following position black makes progress with 1...Qb5+ 2.Kc7, Ke4.
But at times the solution is not so trivial. In the following position, white has no checks and only one winning move: 1.Qa8!
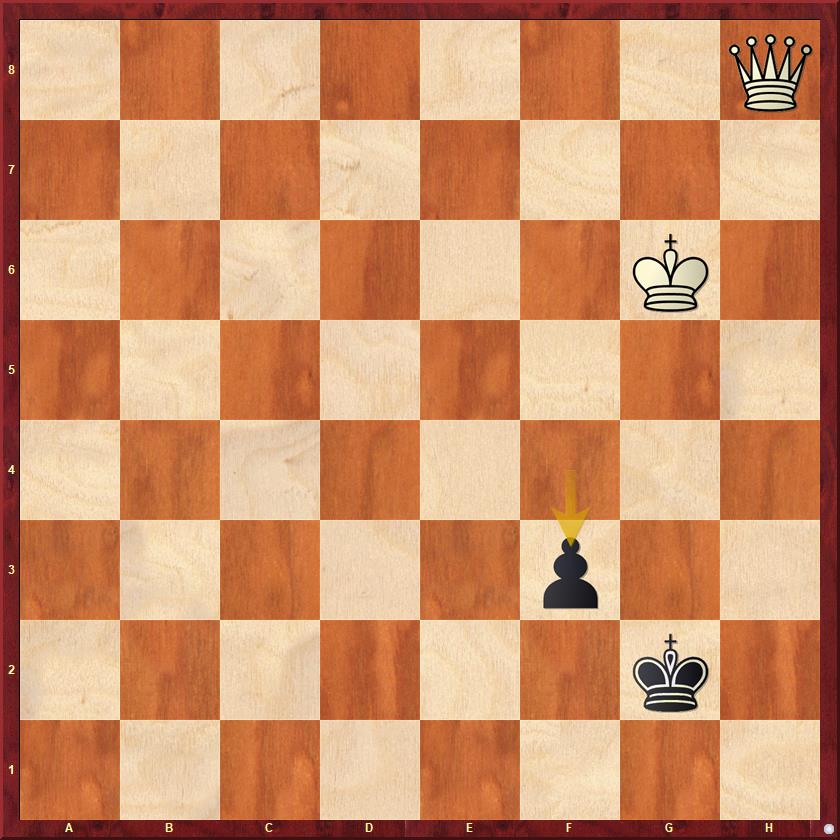
1. Qa8 pins the pawn. After the black king moves out of the pin, white proceeds with checks that advance his Queen closer to the king and ultimately forces it in front of his pawn.

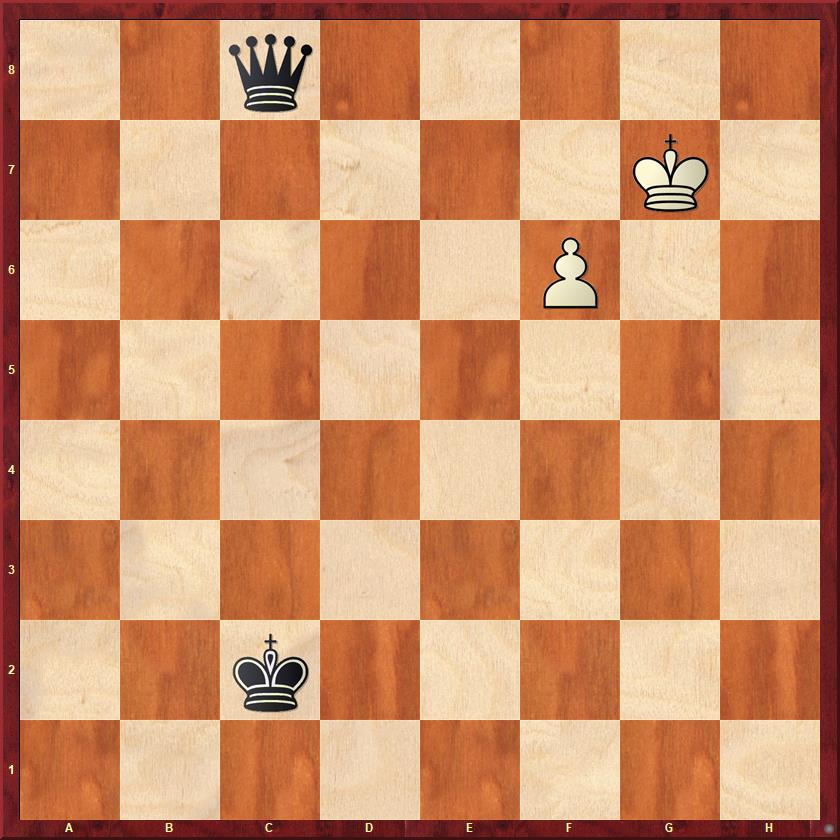
At times checks don't seem to work as in the following example, where the side with the queen ultimately allowed white to draw because his Qg4+ was met with Kf8 and his Qc8+ was met with Kg7. Instead, black needed to play 1...Qc3 using the pin. Then, if white plays 2. Kg6 black advances his king as 3. g7 is met by 3...Qh8, after which the queen is in front of the pawn.
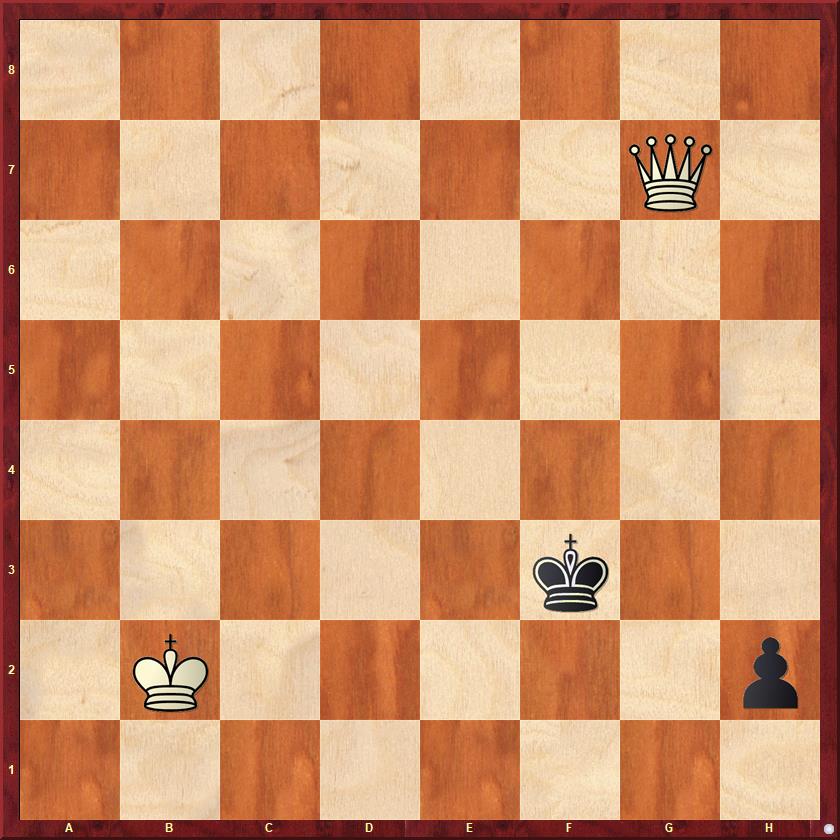
This idea of putting the queen in front of the pawn often works in cases where a rook or bishop pawn is on the 7th rank but its supporting king is on the 6th rank. Many players miss this opportunity. For example, in the following case, 1. Qb7+ followed by 2. Qh1 is the only way to win. 
 In the following position 1.Qh6 wins clearly and is the only winning move.
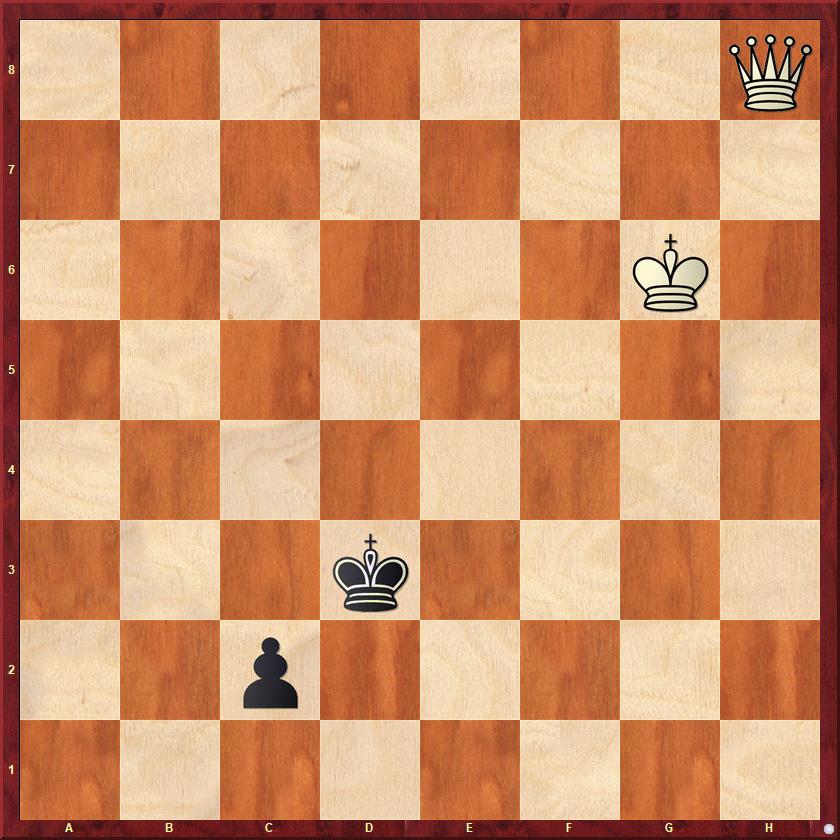
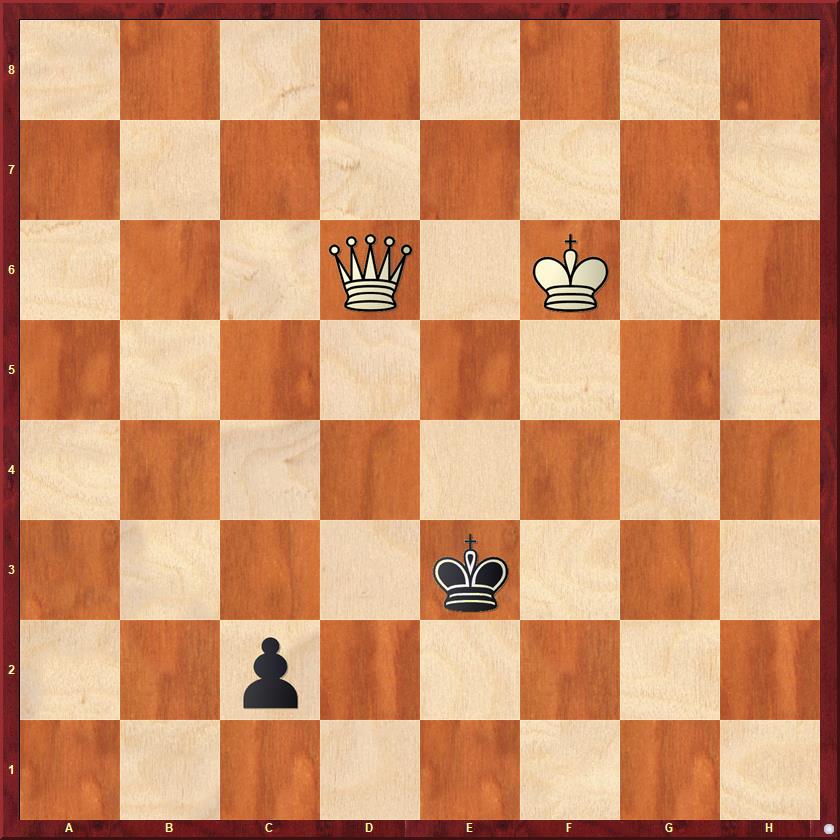
A more complicated and beautiful example of this is the following position in which the white player rated over 2300 missed the winning idea: 1. Qh2! (if 1...c1=Q then 2.Qh6+), 1...Kd3 2. Qf4!
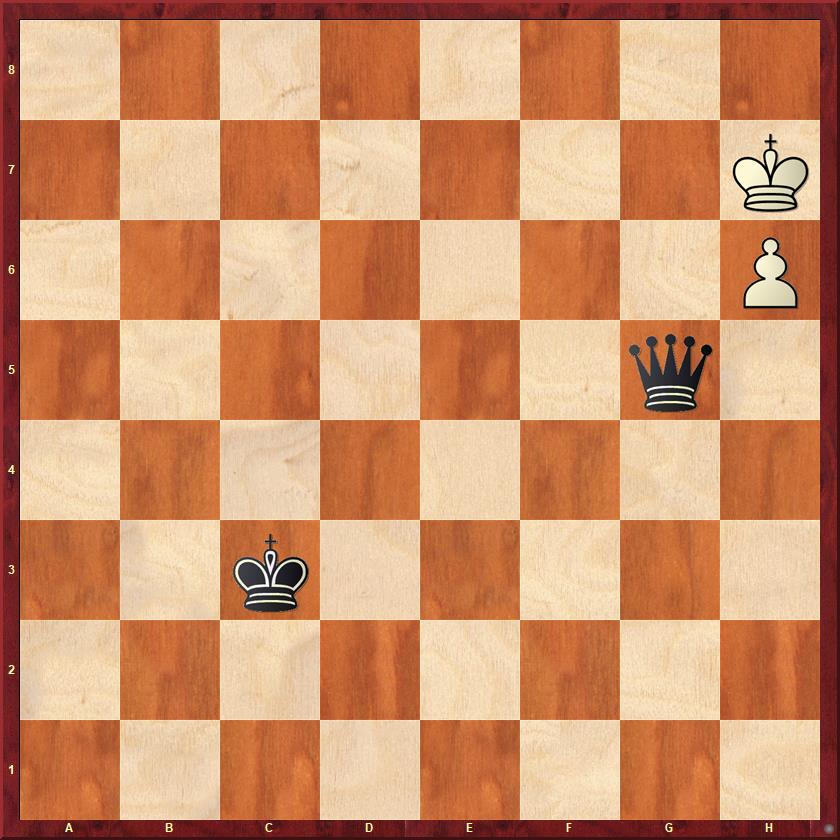
Finally, a word about Queen vs. rook pawns on the 6th rank. Many amateurs are unable to win this. The winning idea is simple once you know it. It is to check the king until you get the following position. If it is black to move, he just moves his king, effectively giving the move to white who is in Zugzwang as white's only move is Kh8 after which he loses the pawn and the game.
These positions and ideas should be but are mostly not covered in basic endgame manuals.  GMs may be surprised, but the solutions to these positions are not obvious to amateurs.

[Note on methodology. I searched Chessbase's Mega database for all games from 2019 to the present which have a queen vs a pawn on the board for five or more moves and then compared the result of the game to the result the tablebase gives for best play when the queen vs pawn endgame appears. When there was a discrepancy between the two, I looked at the games and found the following. Some discrepancies were due to blitz premove blunders or people losing on time. Others were due to totally irrational play by beginners. Most of the rest, were not the result of failures in theoretical positions with pawns on the 7th rank, but rather failures to win when the pawn was on the 6th rank or less.]

Tuesday, July 28, 2020

Calculation in the Engine Age: A review of Jacob Aagaard's "Excelling at Chess Calculation"

I certainly enjoyed reading this book on calculation (and plan to give Aagaard's book on calculation in his Grandmaster Preparation series a try), but have mixed feelings about it. First the positives and then the negatives.
On the positive side, even now in the golden age of chess books there are very few books on calculation, and Aagaard's is probably as good as any. I like Aagaard's emphasis on the importance of finding candidate moves because, as he says, the most important errors are often right at the beginning of the calculation process when a key possibility is ignored. Finding good candidate moves is, he argues, more important to success than the accuracy of long calculations. Aagaard gives some interesting suggestions about how get better at finding candidates. This part of the book is original and first rate. Otherwise, most of what Aagaard says about calculation techniques and when to calculate is not especially new. Aagaard draws extensively from the legendary trainer Dvoretsky as well as Jonathan Tisdall's discussion of the use of stepping stones in visualization in his book Improve Your Chess Now. Not that this is a problem. Aagaard freely acknowledges his borrowings. His presentation of the key ideas is engagingly written, and most of his illustrative examples are excellent.
My reservations about the book have to do with the question of how to approach calculation in the age of chess engines. Much of Aagaard's analysis is engine reliant (whose isn't nowadays?), and some of the moves and variations he considers would be very difficult for all but the best players to get right the board. In fact, they are so difficult that some of Aagaard's computer aided analysis contains significant errors. One important example of this is his discussion of the 2003 game between Riazantsev and Arbakov on pages 79 to 82. Aagaard criticizes Arbakov for his 21st move and gives an alternative that he claims is better and makes black's defense easier. But the move he gives simply does not work.

(For those who want to explore this, in the above position Arbakov's move was 21..Nxd5, Aagaard's move is 21...Kg7, which does not work because of 22. Qd2, a move that Aagaard skims over, saying that it "will transpose in most lines."(page 80) Stockfish 11 at a depth of 49 gives a 3.33 pawn advantage to white after 21...Kg7; in other words, it considers it losing.) My guess is that in 2004, when Aagaard wrote the book, chess engines simply did not see the refutation of Aagaard's move that they now see in 2020. In actual fact, Arbakov played the best 21st move--that Stockfish 11 can find. This would not be all that important except for the fact that Aagard uses Arbakov's supposed error to issue a more general criticism of him. "Arbakov is not really interested in calculation" (page 81) and basically became a grandmaster because of his natural talent, Aagaard argues. He has not progressed beyond being a normal grandmaster, Aagaard suggests, because he has not put in the hard work needed to go further. Am I wrong to detect a touch of resentment here by Aagaard who had put in hard work and had not yet become a grandmaster when he wrote these lines? Similar insinuations about GM Joel Benjamin (p. 51) indicate that talented players who don't rise to their full potential are a pet peeve of Aagaard.  
Putting the criticism of Arbakov aside, this example points to a larger problem with Aagaard's book. If Aagaard (a conscientious author and international master when the book was published) can't get his home analysis right with the help chess engines, how can an ordinary player hope to get it right over the board? Of course, the best players will get it right most of the time, but how do these examples help improving players (who are, after all, the audience for his book) improve? Some easier examples showing typical errors of less illustrious players playing simpler positions would be helpful for the target audience, described by the publisher as "club and tournament players." After all, as Aagaard himself, wisely says, "one of the most important aspects of training is to build confidence and motivation which is not achieved by trying to solve far to difficult exercises." (page 17) Part of the problem, I suspect, is that Aagaard did not really write this book for "club and tournament players," but rather for himself as part of his eventually successful effort to become a grandmaster. This shortcoming of Aagaard's book is symptomatic of a larger problem with chess books, which rarely give much thought to issues of pedagogy, but that is a topic for another day.
Beyond this, what is missing from Aagaard's book is serious reflection on how incredibly difficult it is to consistently calculate accurately and what this means for practical, over the board chess.  The great world champion Mikhail Tal used this to his advantage by forcing his opponents to calculate and repeatedly won games in which his attacks were objectively flawed, but too difficult for his opponents to refute over the board. Other great players, (I think of Ulf Andersson) although excellent at calculation when they had to do it, preferred to avoid its risks and often won by putting positional squeezes on their opponents that did not require difficult calculations. It may seem strange to want to talk about games won without complicated calculations in a book on calculation, but it is important to know when and how to steer a game toward or away from calculation. More attention to how calculation fits into broader practical, human strategies for winning games would be useful.
Finally, Aagaard said on the Quality Chess blog that "the exercises are not that great [in this book]; I could skip them." I did not try them, so I can't say if he is correct, but I will take his word for it.
For the record, I play over the board tournaments, and my rating is currently 1887 USCF. I know it is a modest rating, but it places me in the 93rd percentile of active USCF tournament players, which should make me part of the intended audience of this book.
I don't imagine that this book would be very helpful for a player rated below about 1800 USCF. Lower rated players might find Andrew Soltis's The Inner Game of Chess: How to Calculate and Win a better book for them. I read it when I was rated around 1600 and found it useful.

Wednesday, July 2, 2014

Beating Inferior Openings: 4.Bc4 in the Four Knights Revisited

In his July 2014 ChessCafe.com review of Or Cohen's A Vigorous Chess Opening Repertoire for Black (2013) Carsten Hansen criticizes this Petroff repertoire book for giving three pages to the Four Knights with 4.Bc4?!, which Hansen considers to be a line that "should have received little or no mention." As I have argued in my first posting on this opening, Hansen is simply wrong when it comes to amateur chess. Amateurs need to learn how to refute such lines, which they will see orders of magnitude more often than the latest theoretical lines played by titled players. More to the point are Hansen's other criticisms of Cohen's book, notably its excessive reliance on long lines of computer analysis and its lack of clarity on its intended audience. Cohen's coverage of the 4.Bc4?! variation of the Four Knights is appropriate for rank amateurs, but its long lines without verbal comment are hardly useful for them. Most amateurs below about 1900 USCF need, I humbly submit, analysis like that offered in this blog's coverage of this line: lots of verbal and visual explanation of the most basic issues in an opening.

Friday, June 20, 2014

Rook Endings 4: Rook Versus Two Isolated Pawns.

We considered the fascinated case of rook versus two connected pawns in the previous post in our rook endgame series. This time the focus is on the rook versus two isolated pawns ending. Let's get right to it.

Second Case: Rook Versus Two Isolated Pawns.

In most rook versus two isolated pawn positions the side with the pawns is defending. The further separated the pawns the more difficult it is for the player with the pawns. This is illustrated clearly by the fact that pawns separated by four or more files can't defeat a rook on the 8th rank.

Monday, June 16, 2014

Rook Endings 3: Rook Versus Two Connected Pawns.

Endings in which a rook faces two pawns are more common and difficult than rook versus single pawn endings. There are 420 games in my mega database from the beginning of 2013 through mid-June 2014 in which this ending is played for four or more moves. 57 or 13.6% of those 420 games did not reach the result expected by the tablebases (meaning that there was a result-changing error). Some of those errors were, as we shall, by very high rated players.

There are basically two types of rook versus two pawn endings:
  1. Where the pawns are connected.
  2. Where they are isolated.
We will cover the case of connected pawns in this post.

Sunday, June 15, 2014

Rook Endings 2: Rook Versus Pawn Continued

In a prior post we examined the key ideas in rook versus lone pawn endings. In this post we will look at some special and complicated cases of this ending. Specifically, we will be looking at the following:
  1. A non-trivial case where the side with the pawn is winning. 
  2. A case in which the rook is between the pawn and its queening square and the attacking king on the other side of the pawn.
  3. The special case of the rook pawn.

Friday, June 13, 2014

Rook Endings 1: Rook versus Pawn

Rook endings are among the most common endings and playing them well is one of the most important and subtle endgame skills. To improve my chess (and hopefully yours as well) I am beginning a series of blog postings on rook endings. We are going to begin with the most basic rook ending: rook versus a lone pawn. These seemingly simple endings can actually be quite tricky and are mishandled more often then you might expect. Since the beginning of 2012 through mid-May 2014, 523 games in Chessbase's mega database reached a rook versus pawn ending that was played out for four or move moves. 47 or 9.2% of those 523 games did not reach the result expected by the tablebases at the moment the rook versus pawn ending began. To be sure, many of the poorly handled endings were by weak players who made silly mistakes, but not all of them. Even grandmasters erred. Clearly, this endgame is not trivial. Its key ideas need to be mastered. They are the following:

Attacking ideas:

1. Cutting the enemy king off at his fourth rank.
2. Gaining or losing tempi with rook moves.
3. Avoiding stalemate.
4. Getting the king in the game.
5. Moving the king to the side of the pawn opposite the enemy king.

Defending ideas:

1. Shouldering away the enemy king.
2. Promoting to a knight.

Let's look at them one by one, and then we will examine a few cases in which more than one idea is used.

Thursday, June 5, 2014

Mate in 549!

Mate in 549 is the latest discovery of the position-crunching supercomputers that calculate tablebases. Tablebases are databases of chess endings that have calculated the optimal moves until a draw or checkmate results. They can be purchased to put on your personal computer. Chessbase, for example, sells a product called "Endgame Turbo" which gives you the solution to all endings with five or fewer pieces and some endings with six pieces on the board. The data for this comes on nine DVDs and occupy 43 gigabytes on your hard drive when fully installed. That may sound like a lot of memory, but the full six piece endgame tablebase requires 1,200 gigabytes. Don't want to pay or clutter your computer with chess moves? You can also plug positions into online tablebase tools to find the chess truth that you seek.

Recently, seven piece tablebases were calculated by a supercomputer at Moscow State University and occupy 130,000 gigabytes. Among the nuggets of chess knowledge uncovered was that the longest forced mate with seven or fewer piece on the board is in 549 moves. Want to try to solve it? The position is as follows:

White to Mate in 549


Can't visualize it to the end? Give up? The solution is here.

After seeing this, I can't help but conclude that chess will never be solved. No computer will every play it perfectly, and the royal game will never be exhausted.

Monday, June 2, 2014

Beating Inferior Openings: Meeting 4.Bc4 in the Four Knights (part II).

In the first part the Four Knights after 4.Bc4 Nxe4 5.Bxf7+ was analyzed. In all lines black is much better. The lines analyzed here start with 4.Bc4 Nxe4 5.Nxe4 d5 (fig 1), which forks white's pieces, regaining the lost material.

Fig 1. Position after 4.Bc4 Nxe4 5.Nxe4 d5.
What is the best way for white to give back the material?

In this position, white has a number of options, only one of which does not hand the opening advantage to black. The main moves are 6. Bxd5, 6.Bb5?, and 6.Bd3. Other moves are, of course, possible, but these are the most commonly played ones. Let's consider each of them.

Saturday, May 31, 2014

Beating Inferior Openings: The First Installment of an Occasional Series (Meeting 4.Bc4 in the Four Knights)

Cyrus Lakdawala writes in his book The Four Knights: Move by Move that black players who open with 1.e4 e5 2.Nf3 Nc6 are likely to be poorly versed in Four Knights theory because they encounter the Ruy Lopez (that begins with 3.Bb5) more often than the Four Knights that white invites with 3.Nc3. This is simply wrong!

To be more precise, although Lakdawala may be right for master-level games, he is wrong when it comes to rank amateurs (rated 2000 USCF and below). Amateurs often lack either the time or inclination to study opening theory in detail, and when they do it is often because they obsess about one system. (Just think of all the Najdorf and Dragon Sicilian fanatics.) They take shortcuts, and taking shortcuts means deviating early from main lines to cut down the amount of theory that you need to learn. The Four Knights is precisely such an opening. Instead of learning the reams of theory in the Ruy Lopez (not to mention the Petroff), you can just learn the Four Knights. Even better, you can focus your efforts on one variation such as the Scotch Four Knights, and your opening study problems are solved! I don't play the Ruy Lopez (at least not yet!). Instead, I play the Petroff, and in my last thirteen over the board USCF rated games that began 1.e4 e5 2.Nf3 Nf6 white only played the Petroff main nine continuations of 3.Ne5 and 3.d4 three times. White in two of the three games was a class A player, showing that perhaps real attention to opening theory begins in class A. 3.d4 was played only once, and I had seen it so infrequently that I had forgotten the opening theory and lost because of an error in the opening. Five of the thirteen games continued 3.Nc3, inviting a Four Knights, which I played. Four of the games continued with the modest 3.d3, and one continued with 3.Bc4, playing in the style of the Italian Game.

Friday, May 30, 2014

Real Over the Board Tactics

Chess problem books would have you believe that most over the board tactical challenges are about winning a piece of delivering checkmate. More often it is a question of winning a pawn (often with compensation for the opponent--those famous poisoned pawns) or achieving a slightly better position than one would otherwise have. In these cases evaluation is no less important than analysis. The following game ended early because my opponent disconnected, but on the last move I was faced with a difficult problem. What would you play in the following situation?

White to move...


I played 14. Bb2?! You can find the analysis and learn what the best move is here: sputnick 2081 - dp15 1789, 45 45 time control.

Taking Advantage of Blunders

When your opponent blunders and loses material, he often has compensation in the form of a gain of time or better piece placement. Consequently, it is important to be very accurate when attempting to reel in the point after gaining material. In the following game, my opponent blundered in the opening. After 1. e4 e5 2. Nf3 Nf6 3. Nc3 Nc6 4. Bb5 Nd4 5. Nxe5 Qe7 6. Nc4?? c6 7. Ba4 b5 8. d3 we reached the following position with black to move. How should black capture?


8...bxa4 or 8...bxc4, which is best?


I chose 8...bxa4 on the general grounds that the bishop seemed dangerous on the same diagonal as the king. This is wrong. Concrete analysis is needed. From that it is clear that the knight on c4 is a much more dangerous piece as it threatens to land on the weak d6 square. Further, after bxc4 it will take some work to get the bishop on a4 back in the game.

I won in the end, but a better opponent could have equalized as the following analysis shows: hypernova2-sputnick, 45 45 game on the ICC.

Lessons to learn:
  1. 1. Don't make decisions on general grounds alone; rely on concrete analysis instead.
  2. 2. Consolidating and winning after gaining material is not always easy; it requires work.


Wednesday, May 28, 2014

Responding to 1.d4 with the Nimzo Indian and Ragozin.

I am in the process of revamping my opening response to 1.d5. Currently my repertoire consists of the Nimzo Indian and Queen's Indian. I feel that I understand the common themes of the Nimzo very well and have scored accordingly, but the Queen's Indian remains hard for me to grasp. My results in it have not been great either. Since I don't see myself making progress with the Queen's Indian any time soon, I have decided to remove it from my repertoire. Since I want to keep  playing the Nimzo, I have devised a repertoire that combines the Nimzo with the Queen's Gambit Declined. Specifically, it starts as follows: 1.d4 Nf6 2.c4 e6. Now, if 3. Nc3, I play 3...Bb4 the characteristic move of the Nimzo. And if 3. Nf3, I play 3...d5 with the idea of playing a Ragozin variation of the Queen's Gambit Declined, if possible. It looks at the current stage of my research that white can force an exchange variation by playing 4.cxd4, but the exchange variation with Nf3 is generally considered less dangerous.

3...d5!? is coming!


My guess--but my readers can tell me if I am wrong--is that most amateurs who play 3. Nf3 are doing so because they wish to avoid the Nimzo. They probably don't expect to face a QGD after black starts with Nf6 and e6, so you will have them stumped. And, since few opening books cover the Ragozin variation, you might get them out of book very quickly. Of course, they could have figured out these move order issues, in which case the game will be a hard fight--but that is ok as well.

For my analysis of move orders click this link to my QGD-Ragozin-Nimzo Move Order Analysis.